Wondering how to remove your elephant anchors?


Here’s a simple guide on how to safely remove Elephant Anchors and leave your walls in good condition.
If you’re thinking about upgrading your TV mount, moving furniture around, or just making changes to your wall setup, you might find yourself needing to remove your Elephant Anchors. These anchors are designed to securely hold heavy loads on drywall, but when it’s time to take them out, it can seem like a tricky task. Don’t worry – removing Elephant Anchors is a straightforward process as long as you know the proper steps to follow.
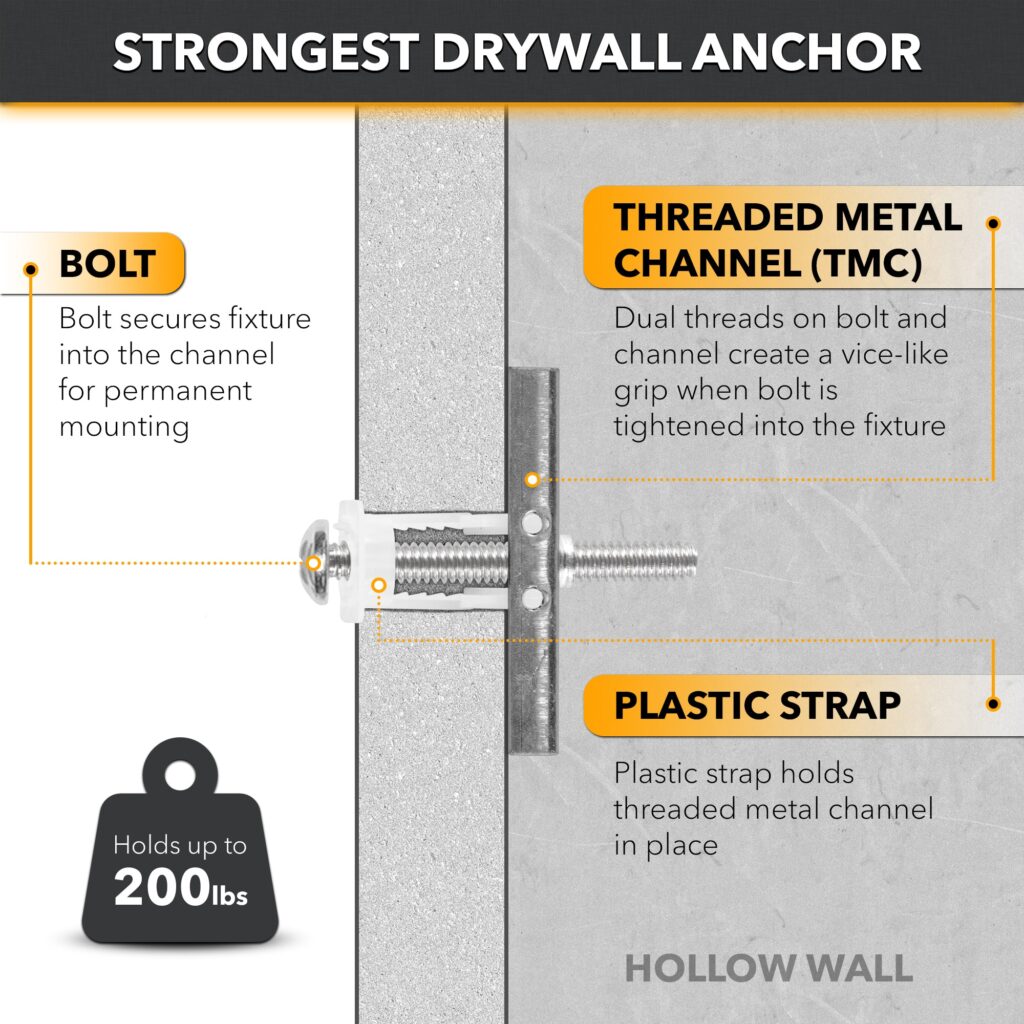
Before we dive into the removal process, let’s quickly talk about why you might have chosen Elephant Anchors in the first place. These innovative anchors are perfect for mounting TVs, shelves, mirrors, and other heavy items on drywall. They provide unparalleled holding power, especially in drywall with or without metal studs, making them the go-to choice for secure installations. They work by expanding behind the drywall, distributing the weight evenly and preventing damage to the wall.
However, sometimes life changes, and so do your mounting needs, which is where the removal process comes in.

Assess the Anchor Type:
Elephant Anchors come in different shapes and designs, depending on the weight and type of the item you’re mounting. The most common anchor types include the expanding sleeve and the toggle bolt. Identifying your anchor type is the first step in determining how to remove it. Most commonly, Elephant Anchors are the expanding variety, which means they create a “claw” behind the drywall.
Loosen the Screw:
The first step in removing your Elephant Anchors is to loosen and remove the screw or bolt that’s holding the mounted item. You can use a screwdriver or drill to unscrew the bolt carefully. Once the bolt is removed, you can discard it or reuse it for a new installation.
Remove the Anchor:
With the screw out, the anchor should still be inside the wall. Here’s where the method differs depending on the anchor type:
For expanding sleeve anchors, the anchor will likely remain behind the drywall once the screw is removed. To extract it, you can gently pull on the exposed end with pliers or a similar tool. Be careful not to pull too hard, as this could damage the drywall.
For toggle bolt anchors, you’ll need to pull out the metal wings behind the drywall. In most cases, you will have to push the wings to the inside of the wall and carefully pull the anchor out. It’s important to be patient and gentle during this process to prevent any further damage to the drywall.
Fill the Hole:
After removing the anchor, you may notice a small hole left behind in the drywall. This is completely normal, and you’ll need to fill it to restore the integrity of your wall. You can use spackle or wall putty to fill in the hole. Simply apply the putty, let it dry, and then sand it smooth. If needed, repaint the area to match the rest of the wall.
Check for Any Wall Damage:
Once the hole is patched, check for any damage to the drywall around the anchor hole. If the anchor was removed too forcefully or if the drywall around it is compromised, you may need to make additional repairs.

While it’s possible to reuse Elephant Anchors in the same hole, it’s generally not recommended to remove and reuse them once they’re taken out of the wall. This is because the anchor will likely lose some of its grip strength, making it less effective in future installations. It’s always best to install new anchors for any new projects.
Removing Elephant Anchors is a simple process when done correctly. As long as you follow the right steps, you can easily remove them without causing significant damage to your drywall. Just remember to fill any holes afterward and check the condition of your wall before mounting anything new. Whether you’re redecorating or relocating your mounted items, this process will ensure your walls stay intact and ready for new mounting solutions.
Discover the ultimate solution for secure wall mounting with our Elephant Anchors! In this video, learn how to use these innovative anchors to mount anything on drywall, even without studs. From TVs to shelves, our anchors provide rock-solid stability, holding up to 90lbs. Simplify your installation process and achieve professional results with ease.
Drilling in tight spaces can be a challenge, but Elephant Anchors make it easy! Designed for compact areas, these durable anchors allow you to securely mount heavy items like TVs, shelves, and more without the need for bulky tools. Their simple installation process ensures efficiency, even in hard-to-reach spots. If you’re tired of struggling with tight spaces, Elephant Anchors are the solution you need for quick, secure, and hassle-free installations.
When working with drywall and metal studs, having the right drill is essential. Corded drills offer continuous power and high torque, while cordless drills provide portability and ease of use. Hammer drills are perfect for tough materials with their hammering action, and impact drivers deliver high torque for driving screws into metal. Right angle drills excel in tight spaces, and rotary drills handle heavy-duty tasks with powerful performance. Choose the right drill to ensure efficient and successful projects every time.